Squats and Knee Pain: How to Keep Squatting Without Damage
 Dr. Ronak PatelPerformance Physiotherapist
Squats do not damage healthy knees.
Knee pain during squats almost always comes from load rising faster than your tissue can adapt, from restricted ankle mobility forcing a poor shin angle, or from technique faults like knees collapsing inward and heels lifting.
The knee travelling forward over the toes is normal and necessary in a squat.
The fix is rarely to stop squatting.
It is to reduce depth or load temporarily, slow the lowering phase, fix ankle range, and rebuild through a stepped regression ladder.
Somebody, somewhere, told you that squats are bad for your knees and that your knees must never pass your toes. That advice has cost more people their squat than any injury ever has.
Squats are one of the most useful movements a human body can train, and the knee is built to bend under load. If squatting hurts, the movement is not the villain.
Something inside how you are doing it, how fast you are adding to it, or what your ankle will allow is the villain. This guide separates the two, and gives you a ladder to climb back down and then back up.
Why squats get blamed for knee pain
The squat is the movement most likely to be happening when a nagging knee finally announces itself, so it takes the blame. But think about what a squat actually is: a controlled, loaded, deep bend of the knee, hip and ankle together.
That is exactly the pattern your knee uses to get off a chair, climb a staircase, sit on a low sofa, and get up off the floor at forty and at seventy. A knee that cannot tolerate a squat is a knee that will struggle with ordinary life later.
Cartilage, tendon and bone all respond to load the same way muscle does: they get stronger when loading is progressive and they get irritated when it is sudden. When someone tells you squats wear out knees, they are describing what happens when load outruns adaptation, not what squats do.
That warning lands hardest on younger lifters who have been told their knees are already wearing out, a claim knee pain at a young age takes apart.
The knees over toes myth, properly buried
The rule that your knees must never travel past your toes came from a small piece of biomechanics work showing that forward knee travel increases force at the knee joint. That part is true.
What the rule ignored is that the force has to go somewhere. Squatting is a closed chain movement: your feet are fixed on the floor, so the total demand of lowering and standing back up is shared between ankle, knee and hip.
Restrict one, and the others take more. Restricting forward knee travel reduces knee torque, and increases hip and lower back torque substantially.
You have not made the movement safer. You have moved the bill to a different address, usually your lumbar spine.
There is also the ordinary life test. Walk down a flight of stairs and your knee passes your toes on every single step.
Kneel to pick something up, lunge, or step off a kerb and the same thing happens. If forward knee travel damaged knees, no human would reach thirty intact.
What matters is not whether the knee moves forward, it is whether the tissue at the front of the knee has been trained to accept the load it meets there.
Shin angle, ankle mobility and the knee to wall test
To squat deep with an upright torso, your shins must angle forward, and that angle is produced at the ankle by a movement called dorsiflexion. If your ankle allows plenty of it, your knee travels forward smoothly, your heels stay planted and your torso stays tall.
If your ankle is stiff, your body finds the range somewhere else. It lifts your heels, throws your chest forward, turns your feet out hard, or lets your knees collapse inward to steal a bit of extra range.
Every one of those compensations concentrates load where it was not meant to go, which is why an ankle test belongs before any squat form correction.
The test takes thirty seconds and tells you more about your squat than any form video. Stand facing a wall in bare feet.
Place the toes of one foot about a hand span, roughly ten centimetres, from the wall, with your foot pointing straight ahead. Keeping your heel firmly down, drive that knee forward and try to touch the wall with your kneecap.
If the knee touches easily with the heel flat, slide the foot further back and try again. Measure the distance from the wall to your big toe at the furthest point where the knee still touches with the heel down.
Compare left and right.
- Under 5 cm. Meaningfully restricted. Expect heels lifting, a forward-leaning squat, or knees drifting inward at depth.
- 5 to 9 cm. Workable for most lifters, but likely limiting your depth and comfort under heavier loads.
- 10 cm or more. Usually plenty of ankle range. If squats still hurt, look at dosing and control, not mobility.
- A side-to-side gap of more than 1.5 cm. Worth attention on its own, because the stiff side will be quietly compensating on every rep.
If you are restricted, work the ankle with a loaded stretch rather than a passive one. The knee to wall drill itself, done as slow reps with the heel pinned and gentle overpressure, plus calf work through a full range from a step, gives the tissue a reason to keep the range.
Elevating your heels on small plates or lifting shoes is a legitimate short-term fix, not cheating. It restores the shin angle you cannot yet produce yourself, so you can keep training while the ankle changes.
Just do not let the plates become permanent while the ankle stays stiff.
Depth: how low should you actually squat
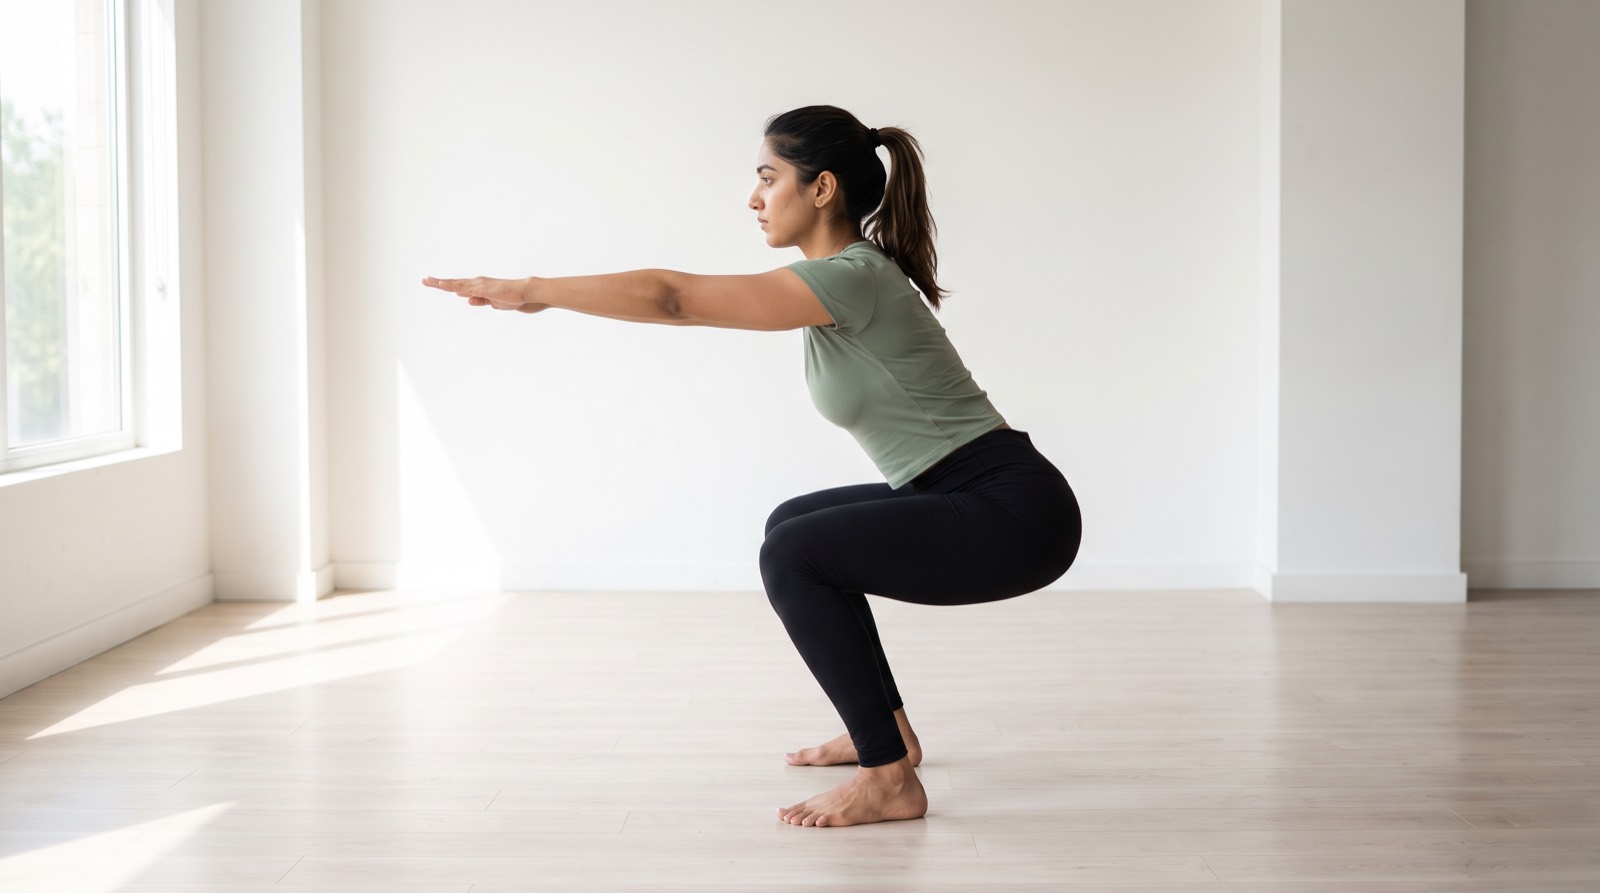
Depth is not a moral question. The correct depth is the deepest position you can reach while keeping your heels down, your spine holding its position, and your knees tracking over your feet.
For many people that is somewhere between parallel and slightly below. Squatting deeper than your current control allows is where trouble starts, because the last few centimetres are where compensations appear.
Cutting every squat to a quarter range and loading it heavily is no safer, because partial ranges under heavy load stress the front of the knee while never training the muscle at length, which is where much of the protective adaptation comes from. If your knee hurts, shortening the range temporarily is reasonable and reversible.
Squat to a box set at a height where the pain does not appear, train there for two to three weeks, then lower the box. Depth is a dial, not a switch.
Stance width and foot turnout: stop copying other people
Hip anatomy varies more than most lifters realise. The angle and depth of the hip socket differ from person to person, which means the stance that feels smooth for your training partner may pinch for you.
There is no universal correct stance, only the one that lets you reach depth without your pelvis tucking under and without your knees fighting your feet. As a starting point, set your feet slightly wider than your shoulders with toes turned out somewhere between ten and thirty degrees, then experiment across a few sessions with lighter loads and keep what lets you go deepest with the most control.
The non-negotiable rule is that your knees track roughly in line with your feet. Knees driving inward while the feet point outward is the combination that irritates the inner knee and the kneecap most reliably.
Book an assessment at SattvaRig, Science City or Shilaj, and get your ankle, hip and knee tested properly so you know exactly what to change.
The four form faults that genuinely irritate knees
- Knee valgus (knees caving in). The knee drifts toward the midline as you stand up, usually on the heavier reps or the last reps of a set. This compresses the inner knee and shears the kneecap sideways. It is most often a glute strength and control issue, sometimes a foot arch issue, occasionally just a load that is too heavy today.
- Heels lifting. Your weight rolls onto the ball of the foot at the bottom. This is almost always ankle restriction, and it shifts a big chunk of load onto the front of the knee and the kneecap tendon. Heel elevation solves it immediately while you work on the ankle.
- Butt wink (pelvis tucking under at the bottom). A small amount is normal and harmless. A hard, sudden tuck under heavy load is a hip range limit being reached, and it costs your lower back more than your knee. Reduce depth to just above where the tuck starts.
- Rushing the eccentric. Dropping into the bottom and bouncing out is the single most common reason a knee complains in a gym. The lowering phase is where the muscle absorbs force. Drop it and the joint absorbs it instead.
Tempo: the most underused knee-friendly lever
If you change one thing today, change your lowering speed. Take three seconds to descend, pause for one second at the bottom without bouncing, then stand up with control.
This does three useful things. It removes the bounce that spikes joint force at the bottom, it forces your quadriceps to work through the whole range instead of borrowing from elastic recoil, and it exposes exactly where in the range your control disappears.
Most lifters find they have to drop the load noticeably to hold that tempo, which is the point. Same movement, less joint stress, more muscular work, and tendons respond very well to slow, heavy, controlled loading.
Load management: the jump that hurts you
Knee pain in the gym is far more often a dosing story than a technique story. The classic pattern we see: someone returns after a break, or starts a new programme, or adds a leg day, or joins a class, and total weekly leg volume doubles in a week.
Tendon and cartilage adapt more slowly than muscle and far more slowly than enthusiasm. Muscle soreness settles in two days.
An irritated kneecap tendon can grumble for two months. The number to watch is not the weight on the bar for one set, it is total hard sets per week for your legs, and how much that number changed compared with last week.
| Sensible | Flare-up pattern | |
|---|---|---|
| Weekly leg sets | Up by 1 to 2 sets | Doubled in one week |
| Load increase | Around 2.5 to 5 percent | Chasing a new record weekly |
| New exercise | One at a time, light first week | Three new movements at once |
| After a break | Restart at 60 percent of old load | Restart where you left off |
| Deload | Every 4 to 6 weeks | Never |
| Response to soreness | Adjust next session | Push harder |
The regression ladder when squatting hurts
When your knee is complaining, the instinct is to stop squatting entirely. That is the wrong move for most people, because complete rest de-trains the exact muscles that protect the knee, and you return in four weeks weaker than you left.
Instead, climb down the ladder to the hardest variation you can do comfortably, live there until it feels easy, then climb back up one rung at a time. The rung you can perform without pain during and without a next-day flare is your training level.
That is not a demotion, it is your actual current capacity.
| Rung | Variation | Why it helps |
|---|---|---|
| 6 | Full-depth barbell back squat | The goal position |
| 5 | Goblet squat to full depth | Upright torso, lighter spinal load |
| 4 | Tempo box squat, 3 second lower | Controls depth and speed precisely |
| 3 | Split squat or reverse lunge | One leg at a time, less total knee load |
| 2 | Leg press in a pain-free range | Supported, adjustable range, easy to load |
| 1 | Wall sit isometric, 30 to 45 seconds | Builds quad strength with no movement |
Start where you are pain-free and work two to three sessions a week. Isometrics like the wall sit are worth understanding: holding a static contraction for 30 to 45 seconds, repeated four or five times, often reduces knee pain in the short term and keeps the quadriceps loaded when movement is provocative.
From there, leg press lets you control exactly how much knee bend you allow. Split squats reintroduce single-leg demand, which is what stairs and sport actually ask of you.
Tempo box squats reintroduce depth on your terms. Then the goblet squat, then the bar.
Our companion guide, the full physiotherapist knee exercise progression, sets out the dosing for each of these stages in detail.
The pain rules while you rebuild
Rehab does not require complete absence of pain, and waiting for zero often means waiting forever. The rule most physiotherapists use is simple.
Pain up to about 3 out of 10 during the exercise is acceptable if it settles within an hour of finishing. Pain that climbs above that, that makes you change how you move, or that leaves the knee more sore or stiffer than usual the next morning, means the dose was too high.
Adjust the next session, do not abandon the plan. If the same load is comfortable, if the next morning is quiet, and if that stays true for a week, you are ready to add a rung, a set, or a little weight.
Not all three.
How to progress back to a full squat
Progress one variable at a time and give each change a week. Add depth before you add weight.
Add reps before you add load. Add load before you add speed.
Once you can perform your target variation for three sets of eight with a controlled three-second lower, and the knee is quiet the following day, move up a rung. Expect the whole climb to take weeks, not days, and expect it to be uneven.
A knee that has been irritated for six months does not settle in six days. If you are also lifting heavy from the floor, the same principles apply to hinging, and we cover that in back pain in the gym: deadlifts, squats and a safe return to lifting.
What else could it be, and when to get assessed
Not all gym knee pain is a squat technique problem. Pain around or behind the kneecap that worsens on stairs and after long sitting often points toward patellofemoral pain, which we cover in the runner's knee guide.
Sharp pain right on the tendon below the kneecap that warms up as you train and stiffens afterward suggests a tendon problem, which needs specific loading rather than rest. Pain deep inside the joint with catching, locking or giving way needs proper examination.
A joint that swells within hours of training is telling you something structural is irritated. If you want a starting point, the free interactive body scanner on this site helps you map where your pain actually sits before you book.
Why an assessment beats another form video
Everything above is general education, and general education can only take you so far, because the reason your knee hurts is specific to your ankle range, your hip shape, your training history and your strength profile. A proper assessment measures those things instead of guessing at them.
At SattvaRig's Ahmedabad clinics we test ankle dorsiflexion side to side, single-leg strength and control, and how your knee behaves under load, then hand you the exact rung of the ladder to train on and the criteria to move up. That is what a mobility and strength assessment is for. Dr. Ronak Patel and the team see this weekly with gym-goers and athletes across the city, and the fix is almost never "stop squatting".
The bottom line
Squats do not wreck knees. Untrained knees meeting sudden load wreck training plans.
Let your knees travel forward, because that is how the joint is designed to move and because blocking it just moves the load to your back. Test your ankles.
Slow your descent. Watch your weekly volume more closely than your one-rep max.
And when the knee complains, regress rather than quit, because the muscle you keep is the protection you keep. If it has been grumbling for more than two or three weeks, or if it swells, stop guessing and book an assessment.
Two clinics, Science City Road and Shilaj, open Monday to Saturday, 8am to 8pm.
Frequently asked questions
No. Forward knee travel is normal squat mechanics and happens every time you walk down stairs or kneel down. Restricting it does not remove load from the body, it simply shifts that load onto the hips and lower back. What matters is that the knee tracks in line with the foot and that the load has been built up gradually.
Usually not. Complete rest weakens the exact muscles that protect the knee, so most people come back weaker and flare up again. The better approach is to regress to a variation you can do comfortably, such as a box squat, split squat, leg press or wall sit isometric, and rebuild from there. If pain is severe, the knee swells, or it locks and gives way, get it assessed first.
Use the knee to wall test. Stand facing a wall in bare feet, place your toes about ten centimetres away, and try to touch the wall with your knee while keeping the heel flat. If you cannot reach five centimetres of clearance, or if one side is more than about 1.5 cm worse than the other, ankle mobility is likely forcing your heels up and loading the front of your knee.
Squat to the deepest point you can reach with your heels down, your spine holding position, and no pain. Using a box set at that height makes the depth consistent and lets you lower it progressively as things settle. Depth is a dial you can turn down for a few weeks, not a switch you have to leave off.
A common physiotherapy rule is that pain up to about 3 out of 10 during the exercise is acceptable if it settles within an hour and the knee is no worse the next morning. Pain above that, pain that changes how you move, or a knee that is stiffer and more sore the following day means the load was too high. Reduce the dose in the next session rather than abandoning training altogether.
Get answers for your body
Reading helps. An assessment fixes. Your first session at SattvaRig is a full strength and mobility assessment at Science City or Shilaj, Ahmedabad.